
Fan of Windows? Me too. But sometimes our institution, workplace, or even school requires us to use a Mac. Or maybe you’re thinking of trying out a Mac yourself, but you’re afraid of leaving the familiarity and comfort of Windows. Fret not, this guide is here to help you.
Switching to a new operating system is always difficult, especially if you’ve been a veteran user of the previous operating system for many, many years. I am a huge Windows fan who bought myself a Mac, and have encountered some difficulties in the transition. So I thought I might write down some tips for veteran Windows users if they do decide to give OSX a try. Being a diehard Windows fan myself, I’ll answer a few queries on the things that you can do to make the transition a little less painful, or if you wish, to have the best of both worlds (BootCamp or Parallels?)
The Basics: Shortcuts and Gestures
Shortcuts
The first thing that you’re going to need to know when switching to a Mac is that maneuvering around the OS is slightly different from what you’ve encountered in Windows. I’ve summarized some of the basic keyboard shortcuts that you should get used to when using a Mac. The general idea is, replace “ctrl” with “command (Cmd)”. This will get you through most of the shortcuts.
Cmd + C = copy
Cmd + V = paste
You get the idea.
An interesting thing to note about Macs is that there’s no such thing as “cutting”, ie no “Cmd + X”. Instead, Apple thinks it’s more intuitive if you just drag and drop stuff where you want them to be. And while I would prefer if they added a keyboard shortcut for it, it does get the job done.
So whenever you’re stuck trying to move stuff around, like “hey how do I transfer music to my iTunes library?” or “hey how do I get my photos out of iPhoto?”, try dragging and dropping. It works most of the time, but requires you to have two windows open.
There is a way to “cut” though. First, you copy the item (Cmd+C). Then you go to whichever folder you want to paste it into. Now, instead of pasting (Cmd+V), you press Option+Cmd+V, which will move the file over instead of copying it. I won’t say which is better, but that they are both different ways of doing the same thing. You might get used to it with time.
Hitting the “X” button (at the top of the window, the red button you’re used to in Windows) doesn’t close an app. Instead, to fully quit an app you’ll have to hit
Cmd + Q
Switching between apps with “Alt + Tab” on Windows can also be done on the Mac. One thing to note though is that if you’ve minimised the app, selecting it on the task switcher will not maximise the window for you. But anyway, here’s how it’s done:
Cmd + Tab

There are a couple of other shortcuts that I occasionally use, and they’re really neat. To take a screenshot on Windows, you’ll have to press “print screen”, then launch MS Paint and paste it there. Or if you have a tablet, Windows button and volume down works too.
 Things are a lot more simpler on Mac. There’s a keyboard shortcut for it:
Cmd + Shift + 3
The screenshot gets saved onto your desktop automatically. Pretty neat huh? While we’re on the topic of screenshots and photos, you might be wondering how to crop photos on Mac. Just open the image in preview, highlight the area you want to be cropped, and hit Cmd + K.
In case you do run into a problem with your Mac, and you’re wondering how to “Alt Shift Del” on a Mac, all you have to do is hit
Cmd + Option + Escape
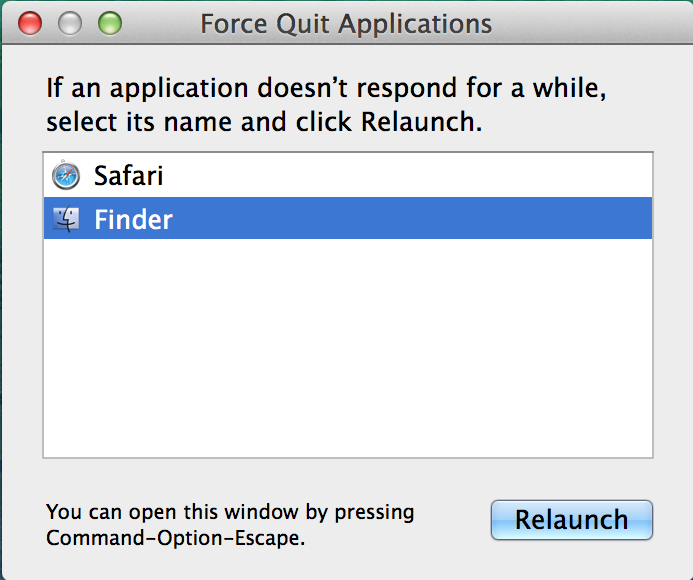
This will bring up the window that allows you to force quit applications, much like Windows Task Manager. It does not allow you to see your running processes though, only apps. For running processes, you will want Activity Monitor.
Gestures
MacBooks come with Apple’s Magic Trackpad, which really does work like magic. I always thought that the gestures on Macs were just a gimmick, but now it’s as though I can’t imagine my life without them. It’s really quite good once you get the hang of it, so let me walk you through the basics.
Or, if you’d prefer, you can just fire up System Preferences > Trackpad on your Mac. Apple has provided some really neat demos on how to use gestures.

Anyway here’s some of the basics:
| Gesture | What it does |
| 2 finger sroll | Scrolls up and down |
| 2 finger pinch, rotate | Zooms in and out, rotate fingers to rotate images |
| 2 finger click | Right click |
| 4 finger swipe up | Mission control (switch between apps, desktops) |
| 4 finger swipe left/right | Switch between desktops |
| 4 finger pinch | Launchpad (view all your apps and launch them) |
| 3 finger drag | Drag files and windows around with 3 fingers (as opposed to clicking and dragging; really neat) |
That’s all I had to know, and it should get you navigating around your Mac with ease. Some of the options are not fixed and can be changed according to your preferences under settings, such as the right click and 3 finger drag.
If you want to have more gestures, Apple does not provide any. However, there are third party solutions that work very well, such as Better Touch Tool. My favourite is Jitouch 2. Out of the box, a bunch of gestures are provided that have special actions linked to them, such as moving between tabs, and you can choose among these gestures and customise to your liking. There are also custom gestures which require you to “draw” a letter to execute an action. You can also have a gesture to quit an app or close the window of an app. The possibilities are endless, as long as there is a keyboard shortcut for it, you can assign it to a gesture.
Some other things to note
There are a couple of other things that confuse Windows users when switching over to Mac. First of all, you’ll realise that files and documents aren’t nicely arranged in invisible “boxes”. Instead, they can be dragged and dumped in any random order, like this:

So what you want to do is right click (ie click with two fingers), and select “clean up by”. This will arrange the icons neatly into little rows and columns.
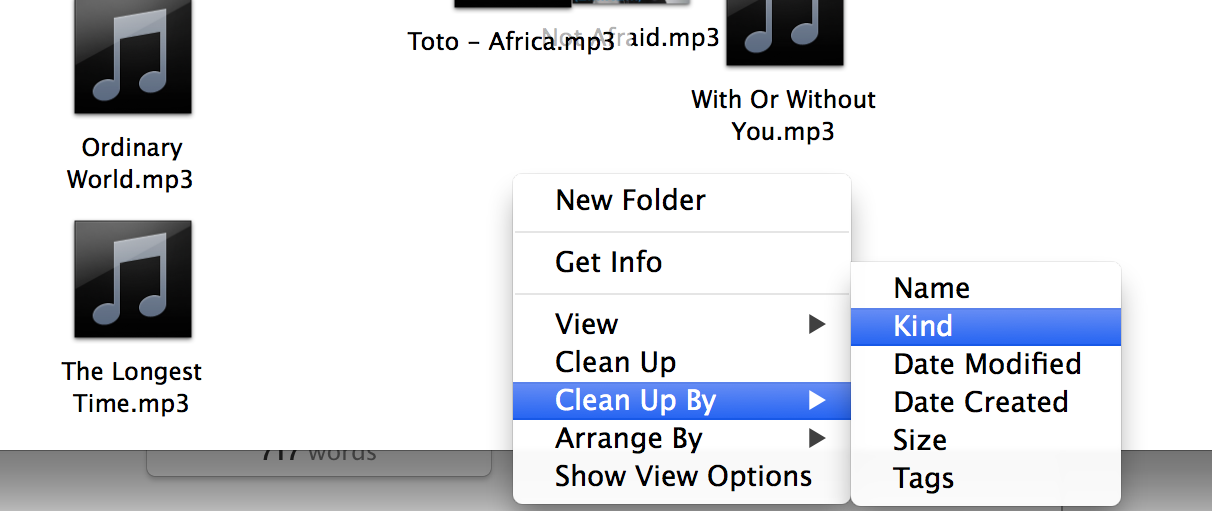
Wait so how is this different from “arrange by”? Well, selecting arrange by will group them into different sub-categories, like so:

Another thing to note is that there is no definitive way of getting to the desktop, unlike in Windows, where you just click on the bottom right of the screen.
Instead, you can hit Cmd + H repeatedly to hide all your windows, or you can open Mission Control (4 finger swipe up), and add another desktop, which you can view and use.
Speaking of desktops, they’re nice virtual spaces for you to work in. Think of it as having multiple monitors on a single device. In Mission Control, you can drag different applications and windows into different desktops, making your workspace more organised.

But I still need Windows, what should I do?

Don’t fret if you miss Windows. It happens to everybody. Perhaps you need to game on your computer, or you need essential Windows applications such as Internet Explorer (yes, some web pages do require it to function).
You might have heard of a couple of solutions to running Windows on your Mac, but you’re unsure of what each of them actually does. This quick guide should get you sorted out.
Parallels
One of the options that you can use for running Windows on your Mac is Parallels Desktop, which simply put, is a virtual machine that can be used to run any OS you want. Think of it as running another computer on your Mac. Once you have Parallels Desktop installed, fire up the application, load Windows on it (get Windows yourself), and you’re good to go. Here’s what it looks like:

The great thing about Parallels is that you don’t have to restart your computer just to use a Windows application. Just launch Parallels from your Launchpad and you can start using Windows.
There’s even a Coherence Mode, which allows you to run Windows applications as though they were apps on your Mac. I can’t really explain this so these screenshots will have to do the talking for me:

Note that as this is a virtual machine, its performance is rather limited. You can set the level of RAM that you want for the machine to your liking. (The max I can safely go is 4GB RAM on my 8GB Macbook Pro with Retina Display). Parallels is fine for say, editing Office documents, or using Internet Explorer, but you definitely won’t be able to game on it.
Boot Camp
So what if you want to game? You’ll have to dual-boot Windows on your Mac by using Boot Camp Assistant (pre-installed on your Mac), which will run you through the steps necessary to get you sorted out. It basically helps you create a partition on your Mac’s hard drive for Windows, and installs Windows there for you (you’ll have to get the copy of Windows yourself though).

Once you have Windows loaded on your hard drive, you’re good to run full-fledged Windows. The Retina MacBook Pro 13 Inch is quite powerful for a casual gamer, and can run games such as BioShock Infinite, Arkham Origins and Portal 2 with little to no lag. I have not done this myself though. Boot Camp isn’t necessary for me as I don’t game.
“But what if I want to have both Boot Camp and Parallels so I can have the best of both worlds?” We hear your cries. There is a way to do that as well, and you will need only one Windows install. Firstly, you must dual boot with Boot Camp. Once you are done with that, boot into your OS X Mavericks partition, then fire up the Parallels application. There will be an option to install using Boot Camp, so go ahead and select that. Note that if you do this, you must shut down Windows the normal way (click Shut Down and wait for it to shut down) when using Parallels (or when dual booting), otherwise the data you changed when using Parallels will not be saved.
Well, that has been our guide to Mac for all you Windows lovers out there. We hope it has been useful. It may not have covered everything you wanted to know, but it’s everything that I had to learn from my personal experience and I feel that it’s sufficient to get you using your Mac without pulling your hair out in rage. If you have any further questions, do let us know in the comments below. Otherwise, do like us on Facebook!